A Practical Guide to Stripe Xero Integration
Unlock automated bookkeeping with our Stripe Xero integration guide. Learn to connect, map transactions, and reconcile fees for your Australian business.
Payly Team
December 29, 2025
Sick of spending hours manually matching your Stripe sales to your Xero invoices? It’s a tedious job that eats up time you could be spending on your actual business. The Stripe Xero integration is the fix, designed to automatically account for every single sale, fee, and refund so you can close your books in minutes, not days.
Why This Integration Changes Everything
If you're an Australian freelancer or run a small service business, you know the grind. You're constantly juggling client work, processing payments, and then trying to keep your financial records straight. Manually keying in every Stripe transaction into Xero isn't just mind-numbing; it’s a recipe for costly mistakes. This admin black hole pulls you away from what you should be doing: growing your business.
The real headache comes from the gap between where you collect your money (Stripe) and where you account for it (Xero). This disconnect leads to frustrating reconciliation puzzles, a foggy view of your cash flow, and hours of wasted effort each month. It's like trying to build a jigsaw puzzle where every sale, Stripe fee, and GST component is a separate piece you have to hunt down and fit into place by hand.
Gain Real-Time Financial Clarity
A direct Stripe Xero integration acts as a bridge between these two critical platforms. Instead of waiting until the end of the month to figure out where you stand financially, you get a live feed. Every transaction that hits your Stripe account is automatically sent over to Xero, giving you an up-to-the-minute picture of your revenue and expenses. This allows you to make smarter, data-driven decisions on the spot.
For a service-based business, this connection brings some huge wins right away:
- No More Manual Data Entry: It completely eliminates the need to record sales, Stripe fees, and refunds yourself, saving you a massive amount of time.
- Reconciliation Becomes a Breeze: Stripe payouts are automatically matched against the corresponding transactions in your Xero bank feed, turning a complex chore into a quick one-click confirmation.
- A Clearer View of Your Cash Flow: You can see exactly when money is coming in and going out, which helps you manage your finances much more effectively.
Get Paid Significantly Faster
One of the best perks is how it speeds up your payment cycle. For Aussie businesses, the numbers speak for themselves. Xero customers who use Stripe get paid, on average, a full 14 days faster. Why? Because the integration lets you add a simple "Pay Now" button directly onto your Xero invoices, allowing clients to pay instantly with a credit or debit card. That little button is surprisingly effective at turning late payers into prompt ones, giving your cash flow a serious boost. You can read more about these payment speed improvements from Stripe's newsroom.
By connecting these two systems, you’re doing more than just saving time on bookkeeping. You're building a solid financial workflow that gets you paid faster, cuts down on errors, and gives you the clarity you need to steer your business with confidence.
Ultimately, this integration is the foundation for a truly automated operational process. Once you have this in place, you can add tools like Payly to complete the picture. This creates a seamless journey from tracking your time and doing the client work all the way through to a fully reconciled payment, with almost zero manual effort required.
Your Step-by-Step Guide to Connecting Stripe and Xero
Connecting your payment gateway to your accounting software might seem a bit technical, but the direct Stripe Xero integration is surprisingly simple. Think of it less as an IT project and more like introducing two colleagues who are about to become best friends. We'll walk through the whole thing, starting right from your Xero dashboard.
Honestly, the entire setup is designed to take just a few minutes, and before you know it, your transaction data will be flowing automatically.
Initiating the Connection From Xero
First things first, log in to your Xero account. This whole process kicks off inside your accounting software, not Stripe, which lets Xero make the initial handshake to pull in the data it needs.
Once you’re in, just follow these clicks:
- Go to the Accounting menu, then select Bank accounts.
- Click the Add Bank Account button.
- In the search box that appears, just type "Stripe" and pick it from the list.
Doing this tells Xero you’re ready to set up a new, dedicated feed for all your Stripe transactions. At this point, you'll be prompted to log in to your Stripe account to authorise the connection. It's a standard security step where you grant Xero permission to access your payment and transaction data; this keeps everything secure and ensures you’re in control.
This diagram breaks down how the connection works to improve your time management, give you better financial clarity, and speed up your payments.
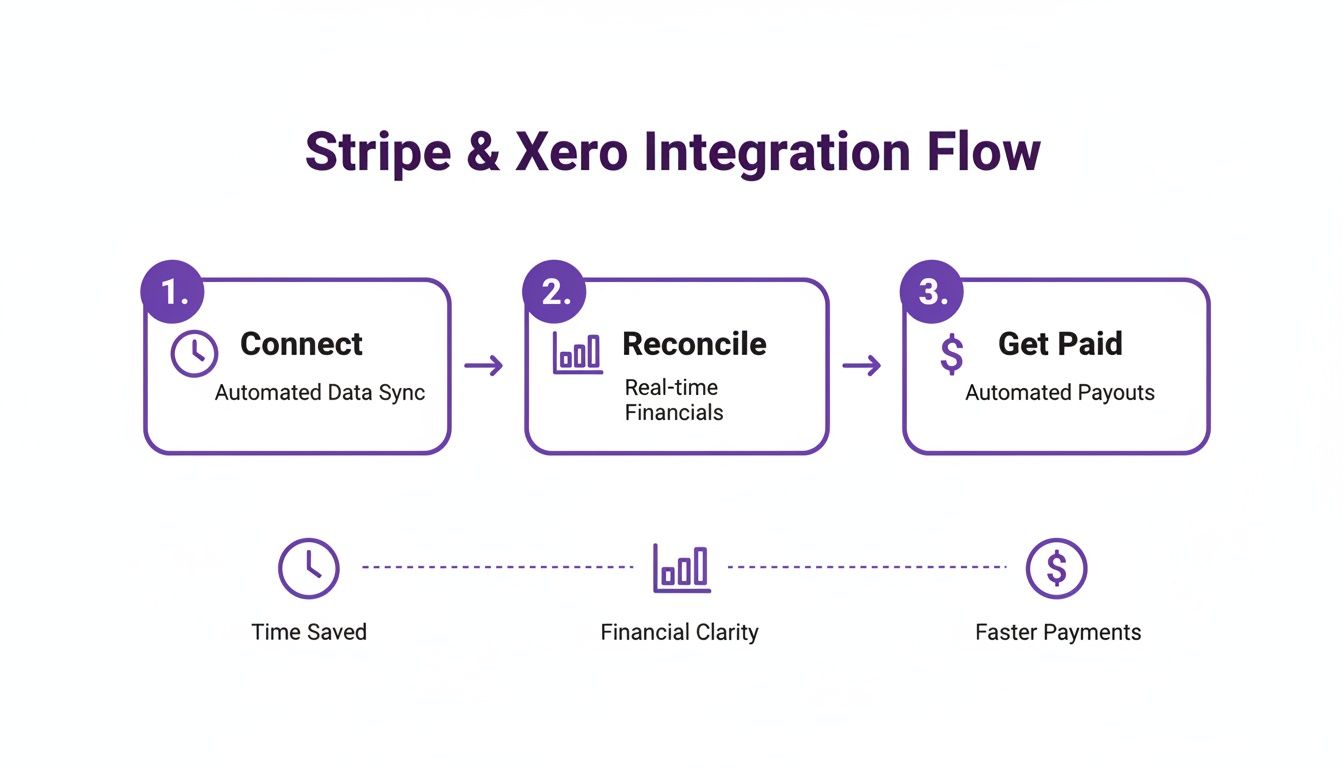
As you can see, a solid integration is about much more than just moving data around. It's about building a smarter, more efficient workflow for your business.
Choosing the Right Accounts and Settings
During the setup, Xero will ask you to configure a few key settings. This is where a little bit of planning now will save you a massive headache later.
You'll need to choose a "bank account" in Xero for the Stripe feed. My advice? Create a new one just for this. Call it something obvious like "Stripe Clearing Account". This isn't your actual business bank account; it’s more like a holding pen where every single sale, fee, and refund from Stripe gets recorded. When Stripe deposits that lump sum payout into your real bank account, you’ll just treat it as a simple transfer in Xero. Easy.
Pro Tip: Using a separate clearing account is the single best practice for a clean Stripe-Xero integration. It walls off all your Stripe activity, making it ridiculously easy to reconcile the batch payouts that actually hit your business bank account.
You’ll also be asked to pick default accounts for your fees and sales. For now, just select your standard "Bank Fees" and "Sales" accounts. We'll get into creating more detailed bank rules to automate this even further in the next section. Getting these settings right is as fundamental as choosing from the best billing and invoicing software to fit your business model.
Finally, choose a start date for the import. A good rule of thumb is to select the beginning of your current or previous financial period to keep your history neat and tidy. Once you confirm, Xero will kick off the first sync, and just like that, your accounts are linked. The foundation for automated reconciliation is officially in place.
Correctly Mapping Transactions and Fees in Xero
Alright, so you’ve got Stripe and Xero talking to each other. That’s the first big step. But now comes the really important part: teaching them how to talk about your money correctly. This is more than just getting data to sync; it's about building a clear story in your accounts so your books are always accurate and ready for tax time.
A great Stripe Xero integration really hinges on how well you map every single transaction.
Think of it like setting up mailboxes in an office. If you don't label them properly, all the mail gets dumped in one big pile. By setting up some smart rules, you can make sure every bit of financial data, from sales income and Stripe’s cut to customer refunds, ends up exactly where it needs to be.

Setting Up Your Chart of Accounts
First things first, let’s get your Chart of Accounts in Xero organised. This is essentially your business's financial filing cabinet. You'll want to have specific accounts ready to go for everything that comes in from Stripe.
Here are the essential accounts I always recommend setting up:
- Sales Revenue: This is the home for all your gross income from Stripe sales.
- Stripe Fees: Create a dedicated expense account just for tracking the processing fees Stripe charges.
- Stripe Clearing Account: As we touched on earlier, think of this 'bank' type account as a holding bay for all Stripe activity before the net amount finally lands in your actual business bank account.
Getting these accounts in place from the start provides the foundation for clean, automated bookkeeping. It cleanly separates the money you've earned from the costs of getting paid.
Crafting Bank Rules for Sales and Fees
Now, let's get into the automation that will save you hours. Xero’s bank rules are your best friend here. They scan your Stripe bank feed for specific details and automatically categorise the transaction for you. It's a game-changer.
Let's walk through a real-world scenario. Imagine you run an Australian web design agency. A client pays your invoice of $1,100 (which includes $100 GST) using Stripe. Stripe then takes its processing fee, which might be around $20.
Here's how you’d set up your bank rules in Xero to handle this perfectly:
- The Sales Rule: You’ll create a rule that looks for transaction descriptions related to your sales income. You then tell Xero to code this income to your "Sales Revenue" account and, this is critical, apply the "GST on Income" tax rate.
- The Fee Rule: Next, create another rule that specifically identifies Stripe’s processing fees. This rule will automatically code that transaction to your "Stripe Fees" expense account.
This clear separation is vital. It gives you an accurate picture of your business's performance and ensures you’re claiming every legitimate business expense you can.
A common mistake I see is business owners only recording the net amount that hits their bank account. This underreports both your true revenue and your expenses, giving you a skewed view of your financial health and potentially causing headaches with your BAS reporting.
To make this even easier, here’s a quick-reference guide for setting up bank rules in Xero for the most common Stripe transactions. Getting these right from the outset ensures your accounting stays accurate and automated.
Mapping Stripe Transactions in Xero
| Transaction Type | Recommended Xero Account | GST Treatment (Australia) | Actionable Tip |
|---|---|---|---|
| Customer Payment (Sale) | Sales Revenue | GST on Income | Code the full invoice amount here, before any fees are deducted. |
| Stripe Processing Fee | Stripe Fees (Expense) | BAS Excluded | Always set Stripe fees as BAS Excluded. There's no GST to claim. |
| Customer Refund | Sales Revenue | GST on Income | Code refunds back to the sales account. This correctly reduces your revenue and GST liability. |
| Payout to Bank Account | Stripe Clearing Account | N/A | This is just a transfer. The rule should match the payout from Stripe to your business bank. |
Using this mapping as your guide will help you build a solid, automated foundation for your bookkeeping, saving you countless hours down the track.
Handling GST Correctly for Australian Businesses
This is an area where a lot of businesses get tripped up, so it pays to get it right. While you must charge and remit GST on your services, the fees Stripe charges you are a different beast altogether. In Australia, Stripe's services are considered a financial supply, which means they are input-taxed.
What does that mean for you? Simple: Stripe fees do not have a GST component.
When you create the bank rule for your Stripe fees in Xero, it is absolutely essential that you use the "BAS Excluded" or "GST Free Expense" tax rate. This tells Xero not to try and claim any GST credits on these fees, which keeps your Business Activity Statement (BAS) accurate.
For more tips on staying compliant, you can check out our detailed guide on the perfect GST invoice template for Australian businesses. Nailing this small detail ensures your GST reporting is spot-on every time, saving you from future compliance headaches.
Making Reconciliation Effortless with Automation
Now that you’ve connected Stripe and Xero and set up your transaction rules, you're ready for the real magic. All that initial setup is about to pay off, turning your bank reconciliation from a painful chore into a quick, almost satisfying, review. Gone are the days of trying to manually match a long list of individual sales against one single deposit from Stripe.
Instead, when you open your Xero bank feed, you'll see simple, one-click suggestions waiting for you. Because your bank rules are already doing the heavy lifting, categorising sales and fees into your Stripe clearing account, Xero can confidently match the lump-sum payout from Stripe to the corresponding transfer. What once took hours of frustrating detective work now takes just a few seconds.

Conquering Stripe Batch Payouts
One of the biggest headaches for businesses using the Stripe Xero integration for the first time is figuring out how to handle the batch payouts. Stripe bundles multiple customer payments, subtracts all the fees, and then drops a single net amount into your bank account. If you’ve ever tried to manually match that one deposit against dozens of separate invoices, you know it's a classic bookkeeping nightmare.
This is precisely where the Stripe clearing account proves its worth. By funnelling every single transaction through this temporary account first, you create a beautifully simple system for reconciliation.
Here’s a look at how it plays out in practice:
- Sales and Fees Are Logged: Every customer payment, refund, and Stripe fee gets recorded as a separate entry in the Stripe clearing account within Xero.
- The Payout Lands: Stripe deposits the net payout (sales minus fees) into your actual business bank account.
- A Simple Transfer: Inside Xero, all you have to do is record this deposit as a bank transfer from your "Stripe Clearing Account" to your "Business Bank Account".
The amount that lands in your business bank account will now line up perfectly with the transfer amount you create in Xero. This creates a flawless, one-to-one match every single time, giving you a clean and easily auditable trail for your records.
The whole point of this automation is to shift your role from data entry clerk to financial reviewer. Your job is now to simply confirm the system did its work correctly, freeing you up to focus on what actually matters: growing your business.
Completing the Automation Loop
Once your payment processing and accounting are talking to each other, you can take it even further by bringing in the other tools you use to run your business. For Australian service businesses, this often means connecting your time tracking and invoicing workflow directly into this automated system.
Platforms like Payly are built to close this loop. You can track your billable hours, generate a professional invoice, and fire it off to your client. When they pay using the integrated Stripe "Pay Now" button, the payment flows straight into Xero and gets reconciled automatically. You can see how the right platform becomes the final piece of the puzzle by reading more about different invoicing software for small business options.
This creates a seamless journey from logged work to reconciled payment with almost zero manual effort required. It’s a powerful setup that gives you back countless hours.
Working Through Common Stripe and Xero Hiccups
Even with a solid setup, automated systems can sometimes hit a snag. When your Stripe and Xero integration has a moment, it’s frustrating, but the fix is usually pretty simple once you know what to look for. Instead of getting bogged down, let’s run through how to quickly troubleshoot the most common issues.
Think of this as your cheat sheet for keeping your financial data clean and your reconciliation process stress-free.
Investigating Duplicate Transactions
Seeing what looks like the same transaction twice is a classic issue and a common cause for alarm. This almost always happens when you’ve got both the direct Stripe feed and the feed from your actual business bank account running in Xero.
The solution lies in the clearing account method we’ve been talking about. You just need to ensure the data flows correctly:
- Your Stripe bank feed is wired exclusively to your "Stripe Clearing Account."
- Your business bank account feed only ever shows the final, lump-sum payout from Stripe.
This simple separation stops Xero from seeing the individual sale in the Stripe feed and then seeing the payout that contains that sale in your bank feed. Problem solved, no more duplicates.
Why Are Stripe Fees Missing?
Every now and then, it might look like your Stripe fees have just vanished from the bank feed. This isn't usually a case of missing data, but more about how Stripe bundles its payouts.
The amount that lands in your bank account is the net amount, that is, the total after Stripe has already taken its cut.
This is precisely why reconciling against the gross transaction amounts in your clearing account is so vital. When you set up bank rules to split the gross sale from the fee, you’re making sure both are recorded properly in Xero, even though they don't appear as separate lines in your main bank account.
Your Stripe clearing account in Xero is your source of truth. It should always show the full picture: the gross sale as income and the Stripe fee as an expense. This is the only way to get a true reading of your revenue and costs, which is absolutely crucial for accurate financial reporting.
Fixing Connection Errors and Discrepancies
An unexpected connection error can bring your data sync to a screeching halt. The first port of call is always the simplest: head to your bank feeds in Xero and try to manually refresh the Stripe connection. More often than not, this is all it takes to kickstart the link after a temporary glitch.
If you spot a payout discrepancy where the Stripe deposit doesn’t quite match what you were expecting, your best bet is to dive into the payout report inside your Stripe dashboard. This report gives you a forensic breakdown of every single transaction and fee included in that specific payout. Just cross-reference it with the transactions sitting in your Xero clearing account to pinpoint any missing sales or wonky fee calculations.
Got Questions About Your Stripe and Xero Integration?
Even with the best instructions, you’ll probably run into a few specific questions once you start connecting the dots. It happens. Let’s tackle some of the most common queries we see from Australian businesses working with the Stripe Xero integration.
How Is GST Handled for Stripe Fees in Australia?
This one trips a lot of people up, and getting it right is crucial for your BAS. In Australia, Stripe's services are a financial supply, which makes their processing fees input-taxed.
What does that mean for you? Simple: there’s no GST component on the Stripe fees themselves. You can't claim any GST credits on them.
When you set up your bank rules in Xero for Stripe fees, make sure you code them to an expense account like 'Bank Fees' or 'Merchant Fees'. The most important part is to select the 'BAS Excluded' or 'GST Free Expense' tax rate. This little step keeps your BAS reports accurate and the ATO happy.
Can I Connect Multiple Stripe Accounts to One Xero Organisation?
Yep, you absolutely can. Xero is designed to handle this. You can set up a separate bank feed for each Stripe account you use. This is a game-changer if you’re running a few different websites or business lines that need their own payment processing.
You just need to go through the connection process for each Stripe account. The trick is to map each one to a different clearing account in Xero. This is how you keep the bookkeeping for each revenue stream clean and separate, which avoids a massive headache when it comes time to reconcile the payouts hitting your main bank account.
Creating a unique clearing account for each Stripe feed is non-negotiable for clean books. It stops different revenue streams from getting jumbled together, giving you a much clearer picture of each part of your business.
What Is a Stripe Clearing Account and Why Do I Need One?
Think of a Stripe clearing account as a digital waiting room for your money. It’s an account you create in your Xero Chart of Accounts (make sure to use the 'bank' account type) that mirrors your actual Stripe account. All your sales, refunds, and Stripe's fees are recorded here first.
Then, when Stripe bundles everything up and sends a payout to your actual business bank account, you simply record that deposit in Xero as a transfer. This transaction moves the lump sum from your 'Stripe Clearing Account' to your 'Business Bank Account'.
This method makes reconciliation a breeze. Why?
- The batch payout amount from Stripe will perfectly match the transfer amount you record in Xero. No more guesswork.
- All the nitty-gritty details, individual sales, pesky fees, and any refunds, stay neatly itemised in the clearing account if you ever need to look back.
Ready to stop juggling multiple apps and start streamlining your entire business operation? Payly combines time tracking, invoicing, e-signatures, and more into a single platform designed for Australian businesses. Ditch the complexity and see how much time you can save. Start your free 14-day trial today.
Payly Team
Sharing insights and strategies to help service businesses thrive. Follow Payly for more tips on time tracking, invoicing, and business operations.
Related Articles


Ready to streamline your business?
Join thousands of freelancers and agencies who use Payly to track time, send invoices, and get paid faster.